Halloween party ideas 2015

 OPTION BOX 

you can only make one selection with option box eg gender it will be either male or female.
follow the following code to learn how to use option box


  1. Select optionbox from the toolbox and draw it.
  2. Give your two option box box the same name.
  3. The compiler will ask to create an array, just click on  yes i will explain on array later on this blog.
  4. Double-click on the one of the option box.
  5. Type in this code. option1.(index). Caption
Where option is the name of your option box; in id the location of the array.

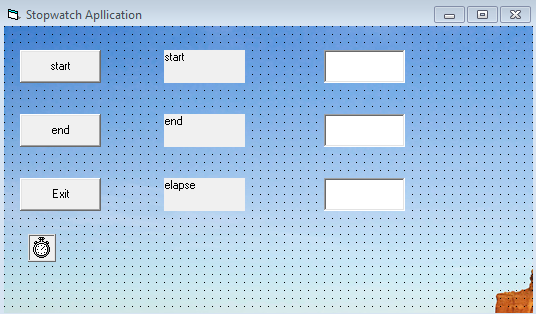
BELOW IS THE INTERFACE:


BELOW IS THE CODE FOR THE STOPWATCH:

Dim elapsed As Variant
Dim startTime As Variant
Dim today As Variant


Private Sub cmdend_Click()
Timer1.Enabled = False
today = Now
txtend.Text = Format(today, "hh:mm:ss")
elapsed = today - startTime
txtelapse.Text = Format(elapsed, "hh:mm:ss")

End Sub

Private Sub cmdstart_Click()
startTime = Now
txtstart.Text = Format(startTime, "hh:mm:ss")
Timer1.Enabled = True
End Sub

Private Sub Exit_Click()
End
End Sub


Private Sub Timer1_Timer()
today = Now
txtstart.Text = Format(today, "h:mm:ss")
End Sub


SIMPLE INTEREST CALCULATOR

Below is the interface of the calculator:


TOOL
CAPTION
NAME
Label1
Enter principal
Label1
Label2
Enter rate
Label2
Label3
Enter time
Label3
Label4

lblResult
Textbox1

txtPrincipal
Textbox2

txtRate
Textbox3

txtTime
Command1
Compute
cmdCompute
Command2
Reset
cmdReset

Below are the code:

Dim principal As Double
Dim rate As Double
Dim time As Double
Dim interest As Double

Private Sub cmdcompute_Click()
principal = Val(txtprincipal.Text)
rate = Val(txtrate.Text) / 100
time = Val(txttime.Text)

interest = (p * r * t) / 100
lblresult.Caption = interest
End Sub

Private Sub cmdreset_Click()
txtprincipal.Text = " "
txtrate.Text = " "
txttime.Text = " "
lblresult.Caption = " "
End Sub
at the first step, we declare our variable using dim and give it a data type double. double has decimal point.
In the second step, we assign our variable to text box and calculate them and also display the result in lblresult (label4)

caption is the name that appear on the form.


<doctype html>
<html>
<head>
            <title>my first web page</title>
</head>
<body>
<h1> this is my first web page</p>
                        <p>the function of this tag is paragraph</p>
                        <marquee>I love this page</marquee>
</body>
</html>

where h1 is the our heading and p is our paragraph.
copy this code to any text editor either notepad, sublime, or notepad++.
save the file name with html extension e.g web.html.
marquee in a moving text or image. once you add marquee your text will start moving.

tag is the opening and closing angle bracket < >.
element is every i.e the tag and what is between it e.g <h1>my first web</p>\

TYPE OF TAG
  1. container tag 
  2. self closing tag
container tag are tag that have opening and closing tag e.g <p> and</p >.
self closing tag are tag that stand on their own e.g <meta/>

note: every tag that is open must be close.

Some basic html tags
  1.  <h1> to <h6> headings
  2. <p> paragrah
  3. <br> break: used to break to another line
  4. <b> bold
  5. <u> under line
  6. <i> italics
  7. <em> emphasis: make text italics inline
  8. <strong> bold: used to bold  character inline
  9. <hr> horizontal: draw horizontal line
  10. <a> anchor: used when you want link to page
  11.  <sup> superscript
  12. <sub> subscript
  13. <abbr> abbreviation: used when you want abbreviate word
  14. <ul> unorder list
  15. <ol> ordered list
  16. <li> list
  17. <q> used for block quotation
  18. <blockquote> used for inline quotation
  19. <cite> indicate site
  20. <dfn> used when new word is introduced
  21. <address> used when you want to put your email address
  22. <ins> underline selected word
  23. <del> cancel unwanted text
  24. <s> cancel text that are block
  25. <dl> definition list
  26. <dt> definition terms
  27. <dd>

Basic HTML Template

<doctype html>
<html>
<head>
            <title>my first web page</title>
</head>
<body>
</body>
</html>

Doctype: tell the browser the type of document you used; in this case we you used html document
html: hyper markup language.
head: title is a child of head. there are some certain element element that only function on the head tag  e.g <script> tag,<meta> tag etc.
title: is the title of the page. the name that appear on your browser tag.
body: every other thing will be done within the body tag.

Tips on how to install wordpress

firstly you need a local server such xamm, wamp and so on. install the local server on your system.
then download a wordpress folder, or if you already follow the following steps:
  1. Copy the wordpress folder
  2. Open my computer
  3. Open local dick (c:)
  4. Open xammp folder
  5. In the xammp folder open htdoc
  6. paste your wordpress folder and rename to your choice
  7. open your xammp app
  8. start only Apache and mysql
  9.  open your browser and type local/your wordpress folder's name (e.g localhost/wordpress)
  10. setup configuration will appear , click on let's go
  11. change only database to any name of your choice
  12. open a new tab and type localhost/phpmyadmin on the address bar
  13. select database at the top
  14. input the same database name you used on the setup configuration then click create
  15. go back to your setup configuration tap and click submit
  16. input your site title
  17. your user name should be root (it is most)
  18. set your password and submit
  19. click install
congratulations you are done with Wordpress installation


Tips on how to create blog:
  1. open a gmail account
  2. click on google apps and then click on more
  3. select blog
  4. on the left hand of the your screen select new blog
  5. input your blog title in the space provided for title
  6. input your blog addreess under the title
note: your blog address will come with blog spot (e.g blogspot.example). this know as sup level domain. there is top level domain but it is not free; to used top level domain you register with domain server for your blog to use (address.com, address.ng).
Powered by Blogger.